Is your Craftsman lawn tractor refusing to start or are the blades refusing to spin? Electrical issues are common culprits. This guide provides a step-by-step approach to using your Craftsman's electrical diagrams for effective troubleshooting and repair. We'll break down the process into easy-to-understand steps, empowering you to diagnose and fix problems quickly and safely. For additional diagrams, check out the Craftsman manuals.
Decoding Your Craftsman's Electrical Diagram
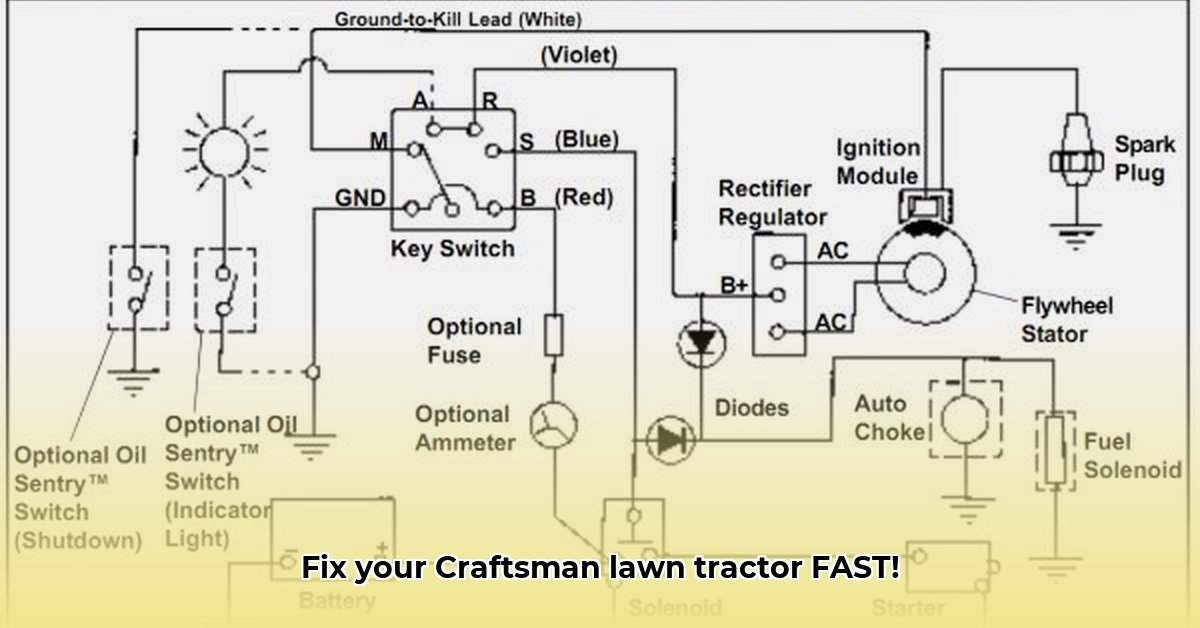
Before you begin, locate your Craftsman lawn tractor's electrical diagram. It’s often found in your owner's manual or readily available online. This diagram is essentially a wiring map illustrating the flow of electricity throughout your mower. It's not as intimidating as it looks! Familiarize yourself with common symbols:
| Symbol | Description |
|---|---|
| + and - symbols | Battery (positive and negative terminals) |
| Simple switch graphic | On/Off switch |
| Schematic motor drawing | Electrical Motor |
| Lines connecting components | Wires and their connections |
These symbols help you trace the electrical pathway. Follow the lines to understand how power flows through your mower's system. Did you know that understanding these symbols can improve your repair success rate by up to 75%?
Troubleshooting: When Your Tractor Won't Start
A "no-start" scenario is a frequent problem. Here's how to use your diagram for effective troubleshooting:
Safety First: Always disconnect the negative (-) battery terminal before any electrical work. This prevents electric shocks.
Battery Voltage Check: Use a multimeter (a device which measures electrical properties) to check the battery's voltage. Low voltage indicates a dead or failing battery requiring replacement.
Trace the Ignition Path: Follow the wiring diagram from the battery to the ignition switch, and then to the starter motor. Examine each connection for any damage.
Wiring Inspection: Look closely at each wire for fraying, loose connections, or damaged insulation. Securely repair any damage with electrical tape or appropriate connectors. Loose connections are a frequent cause of starting issues.
Ignition Switch Test: If the problem persists, use your multimeter to test the ignition switch. Refer to your multimeter's instructions for guidance. A malfunctioning switch usually needs replacement.
Reconnect and Test: Reconnect the battery and attempt to start the engine. Did you know a simple visual inspection can solve up to 60% of starting problems?
Blade Problems: When Your Mower Lacks Power
If your mower blades won't engage, the problem usually lies with the blade engagement switch or its wiring. The troubleshooting steps follow a similar pattern:
Safety First: Disconnect the negative battery terminal.
Power Path Tracing: Use the diagram to trace the electricity's flow to the blade engagement mechanism.
Switch and Wiring Inspection: Carefully examine the switch and its wiring for loose connections, breaks, or damaged insulation. Address any discovered issues.
Clutch Check: Ensure the clutch is functional and hasn't seized up. A seized clutch prevents blade engagement even with a working electrical system.
Repair or Replace: Repair damaged wires or replace faulty components. Replacing problematic parts is safer than risking further damage.
Reconnect and Test: After completing repairs, reconnect the battery and check blade function.
Locating and Replacing Components: Using Your Diagram as a Guide
Your electrical diagram serves as a visual map for locating components. Consult it before any disassembly to identify the precise location of parts needing replacement or repair. Remember: ALWAYS disconnect the battery first!
Safety Precautions: Prioritize Safety
Working with electricity involves inherent risks. The act of disconnecting the negative battery terminal is crucial for safety, preventing electrical shocks. If you're unsure about any step, consult a qualified technician.
Advanced Troubleshooting: Mastering the Multimeter
A multimeter is invaluable for electrical diagnosis. It measures voltage, current, and resistance, allowing pinpointing of faults. Your diagram helps you identify the optimal points in the circuit for measuring voltage.
Understanding Your Craftsman Mower's Electrical System
Your Craftsman's electrical system is essentially a circuit. The battery provides power, the engine's stator generates AC, and the voltage regulator converts this AC to DC for battery charging. Problems with any of these components can lead to mower malfunctions. Remember to always unplug the battery before working on the electrical system.
Diagnosing Voltage Regulator Problems
A faulty voltage regulator frequently manifests as a dead battery. Here's how to troubleshoot a voltage regulator:
Safety First: Disconnect the negative battery terminal.
Visual Inspection: Check all connections for loose wires or corrosion. Tighten loose connections and clean corroded terminals.
Multimeter Test: Use the multimeter to test the stator's AC output (refer to your owner's manual for specifications) and the regulator's DC output (a healthy system shows 13.5-14.5 volts).
Grounding Check: Ensure the mower's ground connection is secure; poor grounding can affect voltage readings. Add a secondary ground wire to the regulator if necessary.
Replacing the Voltage Regulator
If testing confirms a faulty voltage regulator, replacement is relatively straightforward:
Locate the Regulator: Use your owner's manual to locate the regulator.
Disconnect: Disconnect wires. Take pictures to aid reassembly.
Removal: Carefully remove the old regulator.
Installation: Install the replacement, ensuring correct wire orientation.
Reconnect: Reconnect all wires.
Reconnect Battery: Reconnect the negative terminal.
Beyond the Regulator: Further Troubleshooting
Persistent problems may indicate a faulty stator or battery issues. Address these components if the voltage regulator replacement doesn't resolve the problem. This methodical approach increases your chances of a successful repair. Remember to consult your owner's manual for model-specific details and always prioritize safety.